Friday, December 25, 2015

Insert>Fields

Tiny code snippets


Microsoft has included a number of code pieces that you can use without having to haul out the VBA editor. These codes handle such things as page numbers, Table of Contents, Merge data and more.

"Some 80-plus fields are built into Word that provide information about the file and the user; store, display, and manipulate reference information; and link the document to other applications - all without a bit of code."


Automate Word Documents with Minimal Code
By Cindy Meister


Cindy Meister is a Word MVP.

She also works with bobbin-lace. Here is a sample of a Honiton lace butterfly.

Also:

AddBalance.com:
Using { Fields } in Microsoft Word

GMayor.com
Formatting Word Fields with Switches

In 2007-10 you can use the =(Formula) field.
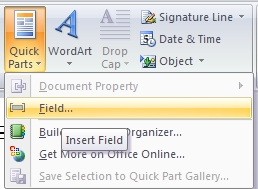
On the Insert tab look for Quick Parts:


See all Topics

Saturday, December 12, 2015

Justify Clean Up

Minimize white space


When a document is formatted with columns, the text is often Justified. This can lead to a messy layout of words and letters.
"When justifying text in Microsoft Word use the hyphenation feature to improve the look of your page. (Without hyphens). . . unnecessary 'white space' is distributed throughout. When hyphenation is turned on the overall typographic color of the page is much more even. To enable this feature in Microsoft Word do the following: After you have justified the columns in your document, choose from the "Tools menu" > Language > then from the dropdown menu, choose "Hyphenation", then choose "Automatically hyphenate document"


FontBlog:
Typography Tip #2


BTW, this goes along with one space after punctuation.
Bill Hill - There is only one space after a period


See all Topics

Friday, December 04, 2015

SCORE Templates

Free business advice


SCORE is a nonprofit organization providing small business advice and training.

SCORE's 10,500 volunteers have more than 600 business skills. Volunteers share their wisdom and lessons learned in business. Our volunteers are working/retired business owners, executives and corporate leaders.
  • SCORE offers Ask SCORE email advice online.
  • Face-to-face small business counseling at 389 chapter offices.
  • Low-cost workshops at 389 chapter offices nationwide.
  • "How to" articles and business templates
Here are some of the available templates:
A Business Plan for a Start-up Business
Microsoft Word
A Business Plan for an Established Business
Microsoft Word
Bank Loan Request for Small Business
Microsoft Word
Break-Even Analysis
Excel
Competitive Analysis
Microsoft Word
Financial History & Ratios
Excel
Loan Amortization Schedule
Excel
Opening Day Balance Sheet
Excel
Personal Financial Statement
Excel

Projected Balance Sheet
Excel
Start-up Expenses
Excel
4-Year Profit Projection
Excel
12-Month Cash Flow Statement
Excel
12-Month Profit and Loss Projection
Excel
12-Month Sales Forecast
Excel

SCORE Template Gallery


See all Topics

Friday, November 27, 2015

Page Numbers

A baker's dozen of ideas


Here is a collection of tips about how to display information in Headers and Footers.

Field codes are demonstrated. Remember that the brackets {} must be inserted with Ctrl+F9, not directly from the key board.

Here's one suggestion:

Display the word "more" at the bottom of every page except the last page.

Insert an "if" field into the footer.

The field in this case will be a compound entity that consists of two fields nested within a third field.

{ IF { PAGE } = { NUMPAGES } "" "more" }
  1. Position cursor where you want the field.
  2. Press Ctrl+F9 to insert the field braces.
  3. Type the field expression as it appears below, using Ctrl+F9 and arrow keys as needed to keep text within the various braces as you type.
    { IF { PAGE } = { NUMPAGES } "" "more" }
  4. Select the entire expression.
  5. Right-click the selection and choose Toggle Field Codes.
    (or use Alt+F9)
Headers and footers and page numbers


See all Topics

Thursday, November 19, 2015

Automate Word Tables

VBA examples and instructions


The Microsoft Developer's Network has a pretty comprehensive article on programmatically working with data and Word tables.

"You can look at the world as split into applications that store data (databases) and applications that present information, such as Microsoft Office Word 2003 and Microsoft Office PowerPoint 2003. Increasingly, the end user demands to display database content in documents and presentations.

While Word does provide some tools for displaying tables from databases in its documents, these are somewhat rudimentary, they require a basic understanding of how the database is built, and using them involves a number of steps. In addition, there may also be security and access issues involved, requiring additional layers of protection.

The developer is therefore increasingly confronted with the task of transferring data into Word, whether in the form of tables, or as part of the document text. This article considers some of the major aspects of using the Word object model to work with tables."


  • Introduction to Automating Tables
  • Creating Tables Programmatically in Word
  • Populating Word Tables with Data
  • Adding Linking in Word Tables Programmatically
  • Extracting Data from Word Tables Programmatically
A downloadable document is also available for those of us still addicted to paper. Automating Word Tables for Data Insertion and Extraction.


See all Topics

Monday, November 16, 2015

Kürzungen für jeder

Accessibility Shortcuts


Several resources are available to help increase speed and effectiveness for keyboard users. Here are keyboard shortcuts for leading Microsoft products that help save time and effort and provide an essential tool for some people with mobility impairments.

  • Internet Explorer (11/10/9/8/7/6)
  • Office (2013/2010/2007/2003)
  • PowerPoint
  • Publisher
  • Windows (8/7/Vista/2003/XP/2000)
  • Windows Media Player
Microsoft.com Keyboard Assistance.


See all Topics

Thursday, November 12, 2015

Mail Merge Page Printing

One big page


After completing a merge to a new document, the status bar may indicate that the insertion point is located on page 1 of 38 pages. This is a bit of mis-information.

If you turn on Show/Hide and look at the merged document in Normal view, you'll see that the merged document has section breaks rather than page breaks.

If you try to print what should be Page 1, the entire document will print.

To print just the first section, use "s1" in the Print dialog box.


Another way to handle it is to go to Edit>Replace and replace

"^b" (section break)

With

"^m" (manual page break)


From Office.Microsoft.com:
In the Pages box, type instructions to print one of the following:

Noncontiguous pages

Type the page numbers with commas between them. Type the range of pages with a hyphen between the starting and ending numbers in the range. For example, to print pages 2, 4, 5, 6, and 8, type 2,4-6,8
A range of pages within a section

Type p page number s section number. For example, to print pages 5 through 7 in section 3, type p5s3-p7s3
An entire section

Type s section number. For example, type s3
Noncontiguous sections

Type the section numbers with commas between them. For example, type s3,s5
A range of pages across sections

Type a range of page numbers and the sections that contain them with a hyphen between the starting and ending numbers in the range. For example, type p2s2-p3s5


See all Topics

Wednesday, November 11, 2015

Graphics from the '50s

Remember it the way you want to


Original fifties clipart? Just in time for the holidays, some Ozzie and Harriet style pics.


"Most communities in the fifties had small town print shops that doubled as printers of local news and advertising papers. These printers could not afford graphic artists so they used stock clipart supplied by large companies who distributed common graphics for use in advertising sections of the papers. They were provided for the printer in lots of categories to meet any advertiser's needs."

Retrographix.com


See all Topics

Thursday, November 05, 2015

Merge Pictures

Different picture to every letter in a mail merge


A variation of this technique could also be used with an IF statement to display different pictures based on some criteria, such as Zip code.
  1. Open the Excel worksheet that you use as the mail merge data source.

  2. Insert a new column that has a column heading such as Picture.

  3. For each row of the Excel worksheet, insert in the Picture column the path and the file name of the picture that you want to use for that record of the data source. Additionally, enclose the path and the file name in quotation marks (").

    For example, copy the path and the file name of the picture in Windows Explorer. Then, paste the path and file name into the Excel worksheet.

    Note The path and the file name of each picture in the Picture column will appear similar to the following example:


    "C:\Documents and Settings\username\My Documents\My Pictures\foldername\filename.jpg"

  4. On the Edit menu, click Replace. Then, replace each instance of a single slash mark (\) with double slash marks (\\) in each path.

    For example, each path should now look similar to the following example:

    "C:\\Documents and Settings\\username\\My Documents\\My Pictures\\foldername\\filename.jpg"

  5. Save and then close the Excel worksheet. Then, quit Excel.
In Word, follow these steps:
  1. Open the mail merge main document.

  2. If the Excel data source is not attached, attach the data source. To do this, go to Step 3 of 6 in the Mail Merge task pane. Click Browse, and then attach the Excel data source.

  3. Click Next: Write your letter.

  4. In the mail merge main document, move the insertion point to the location where you want the picture to appear.

  5. On the Insert menu, click Field.

  6. In the Field dialog box, click IncludePicture under Field names, and then click OK.

    Note You may receive the following error message:

    Error! Filename not specified

  7. Press ALT+F9 to display the field codes in the mail merge main document. You will see a field that is similar to the following field:

    { INCLUDEPICTURE \* MERGEFORMAT }

  8. Move the insertion point into the field immediately following INCLUDEPICTURE.

  9. Press the SPACEBAR, and then click More items on the Mail Merge task pane.

  10. In the Insert Merge Field dialog box, click the picture merge field, such as Picture, and then click Insert.

  11. Click Close to close the Insert Merge Field dialog box.

    The INCLUDEPICTURE field should now look similar to the following field:

    { INCLUDEPICTURE { MERGEFIELD "Picture" } \* MERGEFORMAT }

  12. Press ALT+F9 to hide the field codes in the mail merge main


  13. Click Next: Preview your letters.


  14. Click Next: Complete the merge.

  15. In the Mail Merge task pane, click Edit individual letters.

  16. In the Merge to New Document dialog box, click OK.

  17. On the Edit menu in the merged document, click Select All.

  18. Press F9 to update the fields in the merged document.
    (Word mail merges are not dynamic)

  19. To print your letters from the merged document, click Print on the File menu. Each printed letter will contain the picture that you specified in the Excel data source.
Knowledgebase #909132:
Different picture to every letter in a mail merge


See all Topics

Saturday, October 31, 2015

Almost All You Need to Know

Collection of Word explanations


Shauna Kelly is a Microsoft Word MVP.

She has compiled a gathering of important Word how to's and whys.
For new users of Microsoft Word
Basic concepts - Introduction
Styles in Microsoft Word
Tips for understanding styles
Formatting
How the Styles and Formatting pane works
Numbering, Bullets, Headings, Outlines
How to control bullets
Templates
What is the relationship between a Word document and its template?
Layout
How to keep a figure on the same page as its caption
Sharing Microsoft Word documents
What happens when I send my document to someone else?


Making the most of Word in your business:
Microsoft Word FAQ


See all Topics

Saturday, October 24, 2015

Clip Art Gallery

Sprinkle carefully


Judicious use of Clip art can spice up a document. Here's an article about how to customize existing pictures including:
  • Display clip-related toolbars
  • Customizing your clip art
  • Cropping
  • Sizing
  • Adding text wrapping
  • Blurring
  • Rotating and flipping
  • Adding a drop shadow
Edit clip art in Word


Halloween clips


See all Topics

Thursday, October 22, 2015

Split View

Top and bottom


If you need to look at more than one part of a document at once, consider splitting the window.

To split the current window, just go to Window>Split from the main menu.
(View>Split in 2007)

Another way is to use the splitter control between the file tab channel and the scroll bar for the doc.


To create new windows for the same document, just go to Window>New Window and create as many views on the same document as you would like. (View>New Window in 2007)


Split Screen Feature - Word 2013


See all Topics

Friday, October 02, 2015

Background Printing

Yes, you can!


Remember back in the old days of Word before 2003?

We would demonstrate how a background color or theme could be applied to a document. Then say something like, "But you can only see it on the screen."

That changed with 2003 and '07.

Go to Tools>Options.
(Word 2007+
Click the Microsoft Office Button, and then click Word Options.On the Display menu, click to select the Print background colors and images check box under Printing Options, and then click OK.)

Go to the Print tab and on the Include with document section,
put a check next to "Background colors and images" and click OK.


Now when you apply Theme formatting it will be printed as well as the text.
(A caveat might be that on a black and white printer, the result can appear muddy)

To apply a theme to a document go to Format>Theme. These are the same themes (colors, graphics and fonts) used in FrontPage.

This Knowledgebase article also offers suggestions on how to get around the problem in Word 2002.
Word 2003 or Word 2002 document that includes a background


See all Topics

Monday, September 28, 2015

Merge Formatting

$ lost


The data in Access or Excel has been formatted. You have leading zeros, percents, currency is formatted and so on.

Word 2000+, however loses the formatting when a mail merge is attempted.

Here's a fix.

Word has three potential data access methods, the "old fashioned" ODBC or DDE and the newer OLE DB.

ODBC and OLE DB can, quickly, extract data from a source application without opening the program. The application does not even have to be installed.

The downside is that these methods do not transfer the formatting in the data file. Individual MERGEFIELDs need to be formatted in Word.

DDE can be used with Excel and Access. It communicates with the source and carries the formatting into the target document. This is how it worked before Word 2002.

To have a choice go to:
Tools>Options>General "Confirm Conversions at Open"

When you connect to the Data Source, a dialog box will give you the opportunity to choose the type of connection to use.


If you don't see DDE, check Show all.
Also see:

Cindy Meister:
Mail Merge FAQ

Here are some other Mail Merge resources:
Mail Merge Links


See all Topics

Monday, September 14, 2015

Certificate of Anything

Make your own


Give your kid an award for not setting the house on fire in the last 24 hours.

Make a formal presentation to your dog for scaring away imaginary burglars.

The desktop publishing power of your computer can create official (looking) honors.

Here's a collection of free templates:

Southworth.com
Free Award And Certificate Templates


EducationWorld.com:
Award Certificates


Office.microsoft.com:
Certificates
(86 Certificates, labels, etc. Word, PowerPoint, and Publisher)


See all Topics

Monday, September 07, 2015

WordPerfect?

Word!


I used to ask "How many have ever used WordPerfect?" Over the years it has gone from about 50% to blank stares.

WordPerfect (WP) couldn't bring itself to accept the existence of Windows, and Microsoft ran past, taking over the market.

Word is Object-Oriented, WordPerfect is Stream-Formatted.
"What does this mean? Well, this basically means that when you make a change to a WordPerfect document, the changes take effect 'From THAT Point Forward'. You generally don't need to select an Object (e.g., a word, sentence, or a paragraph) in order to effect a change. You can simply select a color, a font, a paragraph style, etc, and the whole document will be affected (as stated, from that point forward). Stream Formatted is, as you can imagine, like a stream of formatting that flows throughout the document.

Word, on the other hand, is object-oriented. Every letter, word, sentence, and paragraph is an object. To help people grasp the concept of object-oriented programming, Microsoft uses a simple analogy: oranges. You can imagine that an orange has several attributes that can be changed: it has a color, a texture, etc. It can be changed by being painted or peeled. Therefore, once you understand that you need to select an object when you want to manipulate your Word document, you begin to understand how to work in Word."

WP vs. Word

WP is still around. Mostly used in the legal profession by those who still bemoan the loss of powdered wigs.

Here are some references:

The history of WordPerfect:
Almost Perfect
(a book by W. E. Peterson)

Wikipedia:
WordPerfect


See all Topics

Sunday, August 30, 2015

Too Many Slices

More data than the pie will hold


A pie chart displays the per cent of the whole is represented by the component elements. Four salesmen, four slices of pie.

The problem arises when there are 10 or so components that vary in size. The labels begin to overlap and the chart is difficult to read:


One suggestion that Chris Weber offers is to rearrange the order of the slices:


The article uses MS Graph in Access, but the techniques are applicable in all the other applications that can use graphs.

SmartAccess:
Easy as Pie. . .

"Chris Weber provides you with a generic method to control the data for pie charts that are actually readable."

(A downloadable example file is also provided


See all Topics

Friday, August 28, 2015

Redact That!

Redact that!

Weapon of Mass Obfuscation


"Redaction is the careful editing of a document to remove confidential information.

The Microsoft Office Word 2003 Redaction Add-in makes it easy for you to mark sections of a document for redaction. You can then redact the document so that the sections you specified are blacked out. You can either print the redacted document or use it electronically.

Sensitive government documents, confidential legal documents, insurance contracts, and other sensitive documents are often redacted before being made available to the public. With the Word 2003+ Redaction Add-in, users of Microsoft Office Word 2003+ now have an effective, user-friendly tool to help them redact confidential text in Word documents."

The redacted document can be protected and saved. The add-in creates a copy of the original, so original material is still available.


Hide Information:
OfficeWatch.com

Word 2003 Redaction download


Word 2007 Redaction Tool


See all Topics

Friday, August 21, 2015

Wildcards

Seek and find


When you are looking for a particular word or file, wildcards can be used to refine the search.

An asterisk (*) can be used to represent any number of characters. A search for pop* would return popsicle, popcorn, pop1, pop2, pop37, pop29, and pop's favorite chair.

A question mark (?) is a stand-in for a single character. Popc??? would bring back only the word popcorn. Pop? searches for pop1 and pop2, but not pop37 etc.

That's a simple look at wildcards. Word has a rich variety of symbols that can do quite complex search and replace operations.

Here are some links to more detailed discussions:

Word MVP:
Using Wildcards

Felgall Pty Ltd:
Sydney, AustraliaWildcard information

Graham Mayor:
Find and Replace


See all Topics

Tuesday, August 11, 2015

Custom Dictionary

Spell it the way you want to!


Although Office has its own dictionary, it probably does not contain all the words and jargon that you use. If this is the case, you can add your own frequently used terms, and names to the dictionary.
  1. Open Word
  2. From the Tools menu, click Options
    (See link below for 2007)
  3. Select the Spelling and Grammar tab
  4. Click the Custom Dictionaries button
  5. Place a check beside the dictionary you want to modify
  6. Click the Modify button
  7. In the Word field, type in the word you want to add to the dictionary and click the Add button Click OK
  8. Click OK to close the Custom Dictionaries dialog box
  9. Click OK to close the Options dialog box
If you want to remove a word from the dictionary, complete steps 1 through 7. Select the word you want to remove and click the Delete button.
The Custom.dic file is a text file. You can create it or edit it using notepad.
Multiple dictionaries can be created for special purposes, like a list of employee names.
The Custom.dic file is used by all of the Office applications that do Spell checking.
How to add a custom dictionary in Word

About.com: Working With Dictionaries in Word

Microsoft.com How to create an exclude dictionary in Word

Copy the Custom Dictionary to a Floppy Disk and Use It on Other Computers

Error when you add a word to the custom dictionary


See all Topics

Tuesday, July 21, 2015

List All Files

All files in a folder


Here is a macro that will produce a list of all the files in a selected folder.
  • The folder name for the listed files
  • The file names of the files found
  • The file sizes of the files found
  • The dates and times of the files found
  • The total number of files listed
Macro to List All Files in a Folder


See all Topics

Wednesday, July 15, 2015

Free Photos

and other graphics


Robin Good has compiled a list of places that provide royalty free images.
" Finding quality images and photos for complementing an important article, essay or news report is already quite a challenge for many. Imagine when the goal is not just too find good images, but find some that you could openly and freely use without needing to pay royalties or one-time publishing rights to someone."

Free Photographs and Other Visuals

A dozen sources are listed including:
PD Photo.org
"PDPhoto.org is a repository for free public domain photos. Unless something is clearly marked as being copyrighted, you can assume it is free to use. But if you intend to use an image you find here for commercial use, please be aware that standards for such use are higher. Specifically, you should assume no model release was obtained. And pictures featuring products or property should be used with care. The photos are here to be used, but I don't want you to get either of us in trouble over it."


Copyright Information


See all Topics

Monday, July 13, 2015

Microsoft Word 2007-2013 Tutorials

How it's done


Microsoft Office Online:
"It's time to get up to speed with Microsoft Office Word 2013. Learn the best ways to use the new Ribbon, get a handle on finding popular commands, and understand what the new file format does for you."

Microsoft Word 2013 Tutorial

Word 2010 for 2003 Upgraders

Also:

BayconGroup.com:

Microsoft Word 2007 Tutorial


See all Topics

Sunday, July 05, 2015

Word Form or Content

Shape or substance


"The legibility of a typeface should not be evaluated on its ability to generate a good word shape.

Word shape is no longer a viable model of word recognition. The bulk of scientific evidence says that we recognize a word's component letters, then use that visual information to recognize a word. In addition to perceptual information, we also use contextual information to help recognize words during ordinary reading, but that has no bearing on the word shape versus parallel letter recognition debate. "

The science of word recognition
by Kevin Larson
From EyeMagazine
Suggested by:
Microsoft Typography

Also see:
Cmabrigde


See all Topics

Monday, June 29, 2015

Legal User's Guide

Object with style


"At first glance, you might think that not much has changed in the latest version of Microsoft Word; however, when you take a closer you look and discover the added collaboration functionality, research capabilities such as Encarta, translation and more, increased security, and new XML-enabled opportunities, you will quickly realize that Word 2003 offers even more benefits for the legal user."

Word 2003 Legal User's Guide

Charles Kenyon has put together the Intermediate User's Guide.
This Intermediate Users' Guide is based closely on the Legal Users' Guide and supplements it. It contains all the text from the original Legal Users' Guide together with additional guides and links to other resources.


See all Topics

Tuesday, June 23, 2015

Unicode

Index resource

"Have you ever tried to include a passage in a different alphabet in one of your documents, for example a quotation in Russian in an English document, only to find that you have no Cyrillic characters available? Or sent a Spanish document in electronic form to someone in Greece, only to be told that the accented Latin characters have been replaced by Greek characters? Or produced a Web page that includes technical symbols and found that it works with Windows but not with Mac OS or Unix?"
Alan Wood's Unicode Resources

Unicode fonts for Windows computers

From the Word Help file:

If you know the Unicode (hexadecimal) value of a character, you can use the ALT+X keyboard shortcut to enter the character directly in your document.

Type the Unicode (hexadecimal) value of the character. Press ALT+X.
Note: The value string can also begin with U+.

Microsoft Word replaces the string to the left of the insertion point with the character you specified.

You can also use ALT+X to display the Unicode character code for a particular character. Place the insertion point to the right of the character, and then press ALT+X. The character is replaced by its character code. Press ALT+X again to switch back to the character.

  • Љ — Hex=0409
  • א — Hex=05D0
  • ئ — Hex=0626

Editorium.com:
How to use Unicode characters in Microsoft Word

Also see:
Unicode Fonts and Keyboard

Unicode Macros


See all Topics

Tuesday, June 16, 2015

Sequentially Number Documents

Budget0056.doc


Here's an example of how to use an external text file to record incremental numbering.
"Sometimes, when working on a project, you may want to save your documents in sequential order (for example, "0001", "0002", "0003", and so on).
If you wanted to do this manually, you would need to sort through your working directory for the latest file number before you could assign the next number to a new file.
Using this fairly straightforward Word macro, you can make creating sequenced files as easy as pressing a button."

LogicalExpressions.com:

Using Sequential Document Serial Numbers
(Allen Wyatt)

Also see:

Autonumber Invoices


See all Topics

Friday, June 12, 2015

Special Characters

The other letters


  • Ctrl+'
    Adds an acute accent to the character typed next

    Á


  • Ctrl+'
    When followed by d or D, creates the old English character "eth"

    Ð


  • Ctrl+`
    Adds a grave accent to the character typed next

    À


  • Ctrl+^
    Adds a circumflex to the character typed next

    Â


  • Ctrl+~
    Adds a tilde to the character typed next

    Ã


  • Ctrl+:
    Adds a dieresis or umlaut to the character typed next

    Ä


  • Ctrl+@
    Adds a degree symbol above the letters a and A; used primarily in Danish, Norwegian, and Swedish

    Å


  • Ctrl+&
    Creates combination or Germanic characters based on the character typed next

    Æ

    or

    ß


  • Ctrl+,
    Adds a cedilla to the character typed next

    Ç


  • Ctrl+/
    Adds a slash through the letters o and O; used primarily in Danish and Norwegian

    Ø


  • Alt+Ctrl+?
    Creates an inverted question mark

    ¿


  • Alt+Ctrl+!
    Creates an inverted exclamation mark

    ¡


Also see: Word MVPS.org:
How can I insert special characters, such as dingbats and accented letters, in my document? Article contributed by Suzanne S. Barnhill


See all Topics

Wednesday, June 10, 2015

Typography for the rest of us

Real world fonts


Choosing a type face can be fun, but also overwhelming.

You want to convey the message without obscuring the thoughts in an avalanche of weird shapes.

Cameron Moll has a web site/Blog called Authentic Boredom; his "platitudinous web home."

Recently he explored:

The non-typographer's guide to practical typeface selection
"I honestly believe typeface selection is one of the most transparent ways of detecting good - and bad - design. You can tell plenty about a designer merely by the typefaces he/she chooses. So you'd be wise to start with trusted faces, and you'd be even wiser to know something about the history of each typeface."


Also see:
Who was that font I saw you with last night?


See all Topics

Sunday, June 07, 2015

AutoRecover

Recover zapped files


You can use the AutoRecover feature in Word to recover a Word document if your computer loses power or if an application error occurs while you are working in a document.

To set the AutoRecover feature in Word:

1. On the Tools menu, click Options.
2. Choose the Save tab and select the "Save AutoRecover info every" check box.
Set the minutes box to the desired time interval between AutoRecover saves.


The AutoRecover feature does not replace the saving of a document. There is no feature in Word to automatically save your document files. You must periodically save your documents.

What Is the AutoRecover Feature in Word?

How Word creates and recovers the AutoRecover files

"When you perform a full save of your file, there is no way to go back to your original version. If the document was saved automatically, in many instances data would be lost because a full save is irreversible.

In contrast, AutoRecover does not overwrite your original file; this allows you to back out of most errors just by not saving changes when you close the file.

An AutoRecover file is created or updated each time there are changes that have not been saved at the end of the preset time period. You should perform a full save specifically based on progress you've made in your document rather than arbitrarily at regular time intervals.

NOTE: Another way to protect your work and maintain all of your changes is to use the Versions command on the File menu."

Also:

Word.MVPS.org:
How can I make Word save or back up my document automatically?


In Word 2007+ it's under "Office button">Word options> Save.

By design, Microsoft Word does not create an AutoRecover file when you are working in a master document, because the AutoRecover file format is not compatible with the master document file format.

When you use Word as your e-mail editor, Word does not create an AutoRecover (AutoSave) file of your e-mail message.


See all Topics

Friday, May 29, 2015

Don't Check Spelling

Avoid the squiggles


Omitting text selections from Word's spell checking process

If you frequently include macro code listings or other chunks of cryptic information in your documents, Word's spell checker is likely to have a field day pointing out unrecognized words.

You can make Word's spell checker skip over code listings and other information that it is likely not to recognize by applying the No Proofing language setting.
  1. Select the text you would like the spell checker to skip.
  2. Next, select Tools>Language Set Language from the menu bar.
  3. In the Mark Selected Text As list box, select the (No Proofing) option and then click OK.
From now on, the spell checker will skip over the text you selected without flagging any spelling or grammatical errors.
Alan Wyatt's WordTips site has a comprehensive list of spell checker links: Spelling and Grammar Checking

BTW: If you want to spell check Web forms and information boxes you fill out using Internet Explore, look at ieSpell:
"ieSpell is a free Internet Explorer browser extension that spell checks text input boxes on a webpage. It should come in particularly handy for users who do a lot of web-based text entry (e.g. web mails, forums, blogs, diaries).
Even if your web application already includes spell checking functionality, you might still want to install this utility because it is definitely much faster than a server-side solution. Plus you get to store and use your personal word list across all your applications, instead of maintaining separate ones on each application."


See all Topics

Wednesday, May 27, 2015

Signing Macros

Security levels


There are three levels of Macro security:

High:
A computer user can open without a prompt a digitally signed project from a trusted publisher. Otherwise, the application blocks opening signed projects from untrusted publishers as well as unsigned projects.
Medium:
A computer user can open without a prompt a digitally signed project from a trusted publisher. In addition, you can also designate the publisher of a signed project as trusted so their projects will open without a prompt in the future. Unsigned projects are always prompted with a reminder that the file may contain potentially harmful code, but users can elect to open them anyway.
Low:
A computer user can open an unsigned project without a prompt. When users make a Low security setting, they're reminded that they aren't protected from potentially unsafe macros.
Securing Access Databases
"If you've used Access 2003, you've probably seen several security warning messages - Access 2003 cares about your security. An important part of Access 2003 security is digitally signing your code. As Rick Dobson shows, you can do it, but preparing for digital signing is critical.

A digital signature acts like shrink-wrap on your project: Clients know that they're getting a copy directly from you that no one else modified. Clients will also know that they're working with "your" code and not any version of it modified by a third party. As computing moves forward into a "security conscious" era, learning how to acquire and use a digital certificate is also important for interfacing with organizations that adopt policies of only running digitally signed Access 2003 projects: Your users may refuse to accept software from you that isn't shrink-wrapped."
Also:
Signing Access Projects
Other links:

How to make sure that your Office document has a valid digital signature in 2007 Office products and in Office 2003


See all Topics

Friday, May 22, 2015

Sequentially Number Invoices

Creating sequentially numbered documents


Use an Autonew macro to add a sequential number to a document and save it with that number.

In the template from which you create the document, insert a bookmark named Order in the location where you want the sequential number to appear and create an AutoNew macro, as follows:


Sub AutoNew()
Order = System.PrivateProfileString("C:\Settings.Txt", "MacroSettings", "Order")
If Order = "" Then
Order = 1
Else
Order = Order + 1
End If
System.PrivateProfileString("C:\Settings.txt", "MacroSettings", "Order") = Order
ActiveDocument.Bookmarks("Order").Range.InsertBefore Format(Order, "00#")
ActiveDocument.SaveAs FileName:="path" & Format(Order, "00#")
End Sub 


If you do not need to display the number in the document, but just want to save it with a sequential number, there is no need to create the bookmark in the template and you should then delete the second last line of the code.

Article contributed by Doug Robbins
Word MVP Site


Microsoft Knowledgebase:
Macro to Increment Invoice Number to New Form Document


See all Topics

Monday, May 18, 2015

Customize Envelopes

Your own #10


The default layout for envelopes is not sacrosanct to anyone but the postal service.
You can move objects around; add text and pictures.

GMayor.com:
Changing Word Envelope Layouts
Graham Mayor

PC Magazine.com
Custom Envelopes in Word


Microsoft Support:
Create and print envelopes for a mass mailing
40 minute lesson

About.com:
Customizing Envelopes with Pictures


Slipstick.com:
Printing Labels or Envelopes for Contacts
Inserting Addresses into Microsoft Word Documents

"One of the advantages to using Microsoft Exchange or Microsoft Outlook is the ability to use information from the Address Book in Microsoft Word documents. Exactly how to do it, though, isn't obvious. The key is an AutoText entry called AddressLayout. This article shows you how to change this entry and how to add an Insert Address button to the Word toolbar."


From Answers.com:

"USAGE NOTE The word envelope was borrowed into English from French during the early 18th century, and the first syllable acquired the pronunciation (on) as an approximation to the nasalized French pronunciation. Other similar words borrowed from French in the modern period include envoy (17th century), encore, ennui, ensemble, entree (18th century), entourage, and entrepreneur (19th century). Most retain their pseudo-French pronunciations, with the exception of envoy, which, like envelope, is mainly pronounced with (en) now."


See all Topics

Monday, May 11, 2015

Personal Information

Clean it up


If you have enabled the "Allow fast saves" feature, earlier versions of your document, that you thought had been deleted, may still be readable.

If the document was edited with "Track Changes" enabled, a name is associated with each change. You can get rid of all the personal information with a few simple settings.

Choose Options from the Tools menu, click on the Save tab, and uncheck the box labeled "Allow fast saves". Now click on the Security tab and check the box titled "Remove personal information from this file on save".

In Word 2003 the check box's title is: "Remove personal information from file properties on save". When you save the file, the Author, Manager, Company, and Last saved by fields are cleared. Names in comments or edits are changed to simply Author. Any routing slip or e-mail header information is also removed. If the document contains tracked changes, you may want to accept them all before saving.

The Allow fast saves option is global. The Remove personal information option is specific to the current file and is present only in Word 2002 and later. If you want that option to be the default, click on the File Locations tab in the Tools> Options dialog and note the folder containing user templates. In that folder, open the file Normal.dot. Check the Remove personal information box as noted above, then save and close the file. All new files created from this point on will have that feature enabled by default.

Also see:
Charles Kenyon's Word Users Guide:

Confidentiality and MetaData in Word Documents


See all Topics

Wednesday, May 06, 2015

Kearning

More typography


At larger point sizes, it is aesthetically pleasing to move some letters closer together than they would normally appear. For instance, the word "To". The letter "o" can be nudged under the arm of the "T":


Kerning
Adjusting (increasing or decreasing) the space between adjoining type characters.
Kearning pair
Two adjoining type characters to which a particular kearning value is applied.
Kearning value
The space between two adjoining type characters. This value is usually measured in em.

From the Word Help file:
  1. Select the text you want to change.
  2. On the Format menu, click Font, and then click the Character Spacing tab.
  3. Do one of the following:
    • Expand or condense space evenly between all the selected characters

      Click Expanded or Condensed in the Spacing box, and then specify how much space you want in the By box.

    • Kern characters that are above a particular point size

      Select the Kerning for fonts check box, and then enter the point size in the Points and above box.
Note: Selecting Expanded or Condensed alters the spacing between all selected letters by the same amount. Kerning alters the spacing between particular pairs of letters.

Microsoft Typography: A Disagreeably Facetious Type Glossary
WebStyleGuide.com: Webstyle Guide - Typography
About.com: Typography Tutorials
Typographica a journal of typography featuring news, observations, and open commentary on fonts and typographic design. Here's the RSS connection: Typographica Feed


See all Topics

Thursday, April 30, 2015

Mail Merge

Personalize mass mailing

Mail merging creates multiple copies of the same document and inserts data from an external file or database. For example, printing a form letter for different recipients and including each recipient's name.
Word mail merge

FAQ about the mail merge feature in Word 2003 and in Word 2007-10 will help you learn how to use Mail Merge to create form letters, mailing labels, envelopes, or catalogs. It can also help you troubleshoot problems; and provides step-by-step instructions.

The Word MVP site has some more suggestions.

About.com:
Mail Merge
Creating Documents With Mail Merge

Cindy Meister:
Mail Merge FAQ


See all Topics

Sunday, April 26, 2015

Address Layout

Custom layout


When you use the Outlook as a source for addresses, you can customize the display to suit your own needs.

When you use the Insert Address button in the Envelopes and Labels dialog box it does not use the same format as the Insert Address button.

Here's the location to put the Address book on the Quick Access Toolbar in 2007-10:


Here's the work around:
Insert Address Button Does Not Use AddressLayout AutoText Entry

MacroButton; scroll down to Insert Address from Outlook.


Here are two sources with directions about how to reformat the AutoText entry: "AddressLayout".

Slipstick.com
Inserting Addresses into Microsoft Word Documents

Microsoft Knowlegebase:
HOW TO: Modify the Layout of an Address Book Entry


See all Topics

Friday, April 24, 2015

All Fonts

List maker


Here is a macro that will produce a list of all of the installed fonts.


  1. Open Word.
  2. Use Alt+F11 to open the Visual Basic editor.
  3. Choose Insert>Module from the Menu.
  4. Copy and Paste this code in the module.
  5. Return to Word and go to: Tools>Macro>Macros.
  6. Select and run "InstalledFonts".
Sub InstalledFonts()

Dim F As Integer
Dim InstalledFonts As Table

 'Open a fresh document

Set FreshDoc = Documents.Add

'Create a table and define the header

Set InstalledFonts = FreshDoc.Tables.Add(Selection.Range, FontNames.Count + 1, 2)
With InstalledFonts
.Borders.Enable = False
.Cell(1, 1).Range.Font.Name = "Arial"
.Cell(1, 1).Range.Font.Bold = 1
.Cell(1, 1).Range.InsertAfter "Font Name"
.Cell(1, 2).Range.Font.Bold = 1
.Cell(1, 2).Range.InsertAfter "Example"
End With

'Loop through all the fonts and add them to the table

For F = 1 To FontNames.Count
With InstalledFonts
.Cell(F + 1, 1).Range.Font.Name = "Arial"
.Cell(F + 1, 1).Range.Font.Size = 10
.Cell(F + 1, 1).Range.InsertAfter FontNames(F)
.Cell(F + 1, 2).Range.Font.Name = FontNames(F)
.Cell(F + 1, 2).Range.Font.Size = 10
.Cell(F + 1, 2).Range.InsertAfter "ABCDEFG abcdefg 1234567890 &$@"
End With
Next F
'Sort the names of the fonts

InstalledFonts.Sort SortOrder:=wdSortOrderAscending

End Sub

Also see a more sophisticated macro using Excel from Erlandsen Data Consulting: Display all installed fonts (Excel)


See all Topics

Thursday, April 16, 2015

Formatting/Layout Suggestions

Publisher/Word


From the Word MVPS.org site:
Typographical Tips from Microsoft Publisher

..."Word is ubiquitous. If you buy a new computer, chances are good that it will come with some version of Office or Works Suite (which includes Word) installed. Word is a powerful word processing program that incorporates many of the features of a page layout application, but there are times when a page layout or desktop publishing application is what is needed. If you are using the Small Business Edition of Office 97 or Office 2007+, Professional, or Ultimate, you have such a program: Microsoft Publisher.

...even if you use only Word, Publisher can be useful to you. Because once upon a time, at least, it came with an excellent manual. The Microsoft Publisher 97 Companion is a 328-page book (compare this to the 19 pages devoted to Publisher in Discovering Microsoft Office 2000 Premium and Professional), and it contains much material that can be equally helpful to Word users.

For example, the chapter "The Look of Words" discusses what fonts are, how to choose them, and how to get the most from them. The following tips, guidelines, and rules of thumb are excerpted from that chapter [with some comments interspersed]. We have not attempted to reproduce all the illustrations that appear in the actual manual, but even the text alone is helpful."


See all Topics

Monday, March 30, 2015

Make a Dash

M-N-Hyphen


From the Word MVP Forum:
Dashes

There are three kinds of dashes, each a bit longer than the other.
You don't need to put spaces before or after dashes (in the US).

Use the hyphen (-) for hyphenating words.

Use the en dash (–) where you would use "to," as in "business hours are 10 A.M. – 5 P.M.," in a range of numbers (pages 17–25), or to link certain compound adjectives like "the Tokyo–Hong Kong flight" or "anti–blood clotting serum."

Use the em dash (—) instead of parentheses—as is done here—to set off a parenthetical phrase. On the typewriter, two hyphens stood in for this dash.


The keyboard shortcuts are:
Alt+0150 for an N dash
Alt+0151 for an M dash or two hyphens in a row

Here's an article from the Editorium.com:
Making dashes easy
By Jack M. Lyon

Here are articles on:
Colons, Semicolons, and Em-dashes

And:
Interruptive Punctuation


See all Topics

Saturday, March 28, 2015

Embed a Show

Stick it in Word


You might like to distribute a short PowerPoint slide show, and include some extra material.

Open Word and PowerPoint.
Arrange the windows so that both applications can be seen.
(Right-click an empty area of the Task bar and choose "Tile Windows Vertically."

Type your introductory text in the Word document.

Switch to PowerPoint and open the PowerPoint file.

In Slide Sorter View, hold down the Ctrl key and select the slides you want to include.

Drag the selected group of slides onto the Word document.

You will only see the first slide in the document, but if you double-click on the image, the PowerPoint show will run.

It will also work in Excel.

(This, of course assumes that the target machine has PowerPoint or PowerPoint Viewer installed)


See all Topics

Wednesday, March 25, 2015

Tables

Without reservations


Word is more versatile than Excel or PowerPoint when it comes to manipulating how a table will appear. Go to View>Toolbars Tables and Borders, and also see the Table menu especially, "Table Properties" .
(In 2007 go to Insert Table, or Right click the Table)

Often, you will insert a table at the top of a document, and then later realize that you need to enter text above the table.

A keyboard shortcut to fix this is to place the insertion point in the first cell in the top left corner of the table.

Hit Ctrl+Shift+Enter and Word will move the table down and place the insertion point at the top.

This is also the combination used to split an existing table in two.
(If there are no entries in the cell, the Enter key will move the insertion point. If there is text in the cell or a paragraph above the table, then the Enter key will just start a new paragraph inside the cell.)

Here are some more suggestions from the Word MVPS web site:
Maximising the performance of Word tables

PC World:
How to Create Tables


See all Topics

Monday, March 23, 2015

Change Case

CAPS - No - caps


Sometimes mistakes are made in setting the case for sentences.
There are four general categories of capitalization:

Sentence Case - The first letter of a sentence is capitalized

Lowercase - all words are in lowercase

Uppercase - ALL CAPITALS

Title Case - All Words Are Capitalized
(This is, really, "Proper case". Title case would be "All Important Words are Capitalized".
Nouns, verbs, adjectives, and adverbs should be uppercase. Common articles, prepositions, and conjunctions should be lowercase
.)
You can make changes to selected text by going to
Format>Change Case
and choosing the correct style. (Including tOGGLE cASE)
You could also use a keyboard shortcut.
Select the text and then hold down the SHIFT key and tap the F3 key to toggle through three of the main cases – All Cap, Lowercase, and Title.

SAP Design Guild:
Quick Guide to Capitalization in English

From The Editorium.com:
Here's a macro to change Heading styles to true Title case:
TITLE CASE MACRO, VERSION 2
By Jack M. Lyon

Word Tips:
Capital after colon

Automatically correct capitalization in most any MS 2007 App.


See all Topics

Saturday, March 21, 2015

Word is Full of HTML

Clean up tools


From the Help file:
"When you save Web pages format with Microsoft Word, additional tags are added so that you can continue to use the full functionality of Word to edit your content.

To reduce the size of Web pages, you can save them in filtered HTML. Filtered format removes Microsoft Office-specific tags. If you save in filtered HTML and then reopen the file in Office programs, text and general appearance will be preserved, but some features may work differently.

If you reopen a Web page in Word that you saved in filtered HTML, your text and general appearance are preserved, but you may not be able to use certain Word features in the usual way to edit your files. For example, the appearance of bulleted or numbered lists is preserved; however, some of the Word functionality associated with lists will not be preserved.

If you will need to edit the file later, you can maintain two files: one in Word format and one in filtered HTML format. You can edit the content in the Word document, save it in Word format for future editing, and then save a copy in filtered HTML format."


Using filtered HTML save may not clean everything up. If you need more help see Informit.com:
Clean HTML from Word: Can It Be Done?
By Laurie Rowell.

Also:

HTML Tidy Library Project


See all Topics

Monday, March 16, 2015

Holiday Templates

Make your own stationary


Microsoft Office Online has a group of themed holiday designs.

  • Holiday party invitation
  • Holiday menu
  • Holiday place cards
  • Holiday stationery
  • Holiday thank you card (quarter-fold)
  • Holiday gift certificate
Poinsettias


See all Topics

Monday, March 09, 2015

Identify Formatting Inconsistencies

A suggestion I don't suggest


Microsoft Word can detect formatting inconsistencies as you type and then mark them with a blue, wavy underline.You may want to have all the headings in a document formatted the exact same way, but you inadvertently formatted some of them differently. Word can detect these inconsistencies as you are typing and underline them with a blue wavy line to alert you.

Microsoft Word File Tab:
  1. On the menu, click Options, and then click Proofing.
  2. Under Editing options, select the Keep track of formatting check box, if it is not already selected.
  3. Under Editing options, select the Mark formatting inconsistencies check box.
    Formatting inconsistencies will be marked with blue, wavy underlines.
  4. Click OK.
  5. In your document, right-click the blue, wavy underline where a formatting inconsistency has occurred.
  6. Do one of the following:
    To correct the inconsistency, click the command that describes the inconsistency.
    To have Word remove the blue, wavy underline and not correct this inconsistency, click Ignore Once.
    To skip all occurrences of the inconsistency in the document, click Ignore Rule.
ShaunaKelly.com:
How the Styles and Formatting pane works in Microsoft Word 2002 and 2003  

Styles in Word 2010


See all Topics

Monday, March 02, 2015

Word Ranges

Pre-defined locations


When entries are made in a document, Word creates a Story Range to identify what part of the document is being used. These ranges can be used in macros to search for items , change text, or other actions.

This macro, for instance, changes the text in just the header of the first section:

Sub HeaderFooterObject()
Dim MyText As String
MyHeaderText = "This would be your text"
With ActiveDocument.Sections(1)
.Headers(wdHeaderFooterPrimary).Range.Text = MyHeaderText
End With
End Sub

When you use Edit>Replace in Word, it does a fine job of locating all occurrences of the target in the body of the document or in the header or footer.

Something fails, however, when you record the action and try to run it as a macro. To make it work, you must loop through the built in ranges of a Word document.

The exercise is interesting if only for the exposure to the built in ranges such as:

  • wdCommentsStory
  • wdEndnotesStory
  • wdEvenPagesFooterStory
  • wdEvenPagesHeaderStory
  • wdFirstPageFooterStory
  • wdFirstPageHeaderStory
  • wdFootnotesStory
  • wdMainTextStory
  • wdPrimaryFooterStory
  • wdPrimaryHeaderStory

    and
  • wdTextFrameStory.
See this article for more information: Word.MVPS.org:
Find and replace with VBA
 

Also: Microsoft KB
VBA macro examples to insert text into a document


See all Topics