Showing posts with label Shortcuts. Show all posts

Monday, April 02, 2018

Labels by Merging

Demos


As part of their series of demos, Microsoft has information on creating mailing labels from a database, or mailing list.

Create labels with mail merge

Here is another entry concerning some of the fine points.

More label info

Also, if you place a graphic in the first cell, it will be duplicated in each box.


See all Topics

Thursday, March 29, 2018

Index Concordance

Order!


Creating a Table of Contents can be easy if you use Styles. Word will automatically insert a TOC when you place the insertion point and then use Insert>Reference Index and Tables and choose Table of Contents.
(2007+  Reference Tab>Table of Contents group)

An Index or Concordance can be more difficult.

In a larger document, you may want the reader to be able to locate key words. You could go through the whole document and mark each word you want included, but there is an easier way.
  1. Make a list of the important words.
  2. Create a two-column table in a new document.
  3. In the first column, enter the word or phrase.
  4. In the second column, enter the index entry
    (If you need a sub-category, type the main entry followed by a colon (:) and then the sub category.)
  5. Save the file.
When it comes time to create the Index, place the insertion point, go to Insert>Reference Index and Tables. Choose Index and then AutoMark. (2007 – Reference Tab>Index group) Browse to the location of your Index file. Word will now automatically use your list to mark the main document and insert an Index.

Also: Word for Word:
An Index or a Concordance for Your Book?
Microsoft KB:
How to create a table of contents and index with field codes in Word


See all Topics

Wednesday, March 14, 2018

Merge to More Than One Document

Custom content


In the Data Source, include a field for the type of letter the recipient requires.

In the Main merge document, enter IF fields, such as:

{IF {MERGEFIELD "LetterType"=1} {INCLUDETEXT "C:\\Project\\Letter1" \* MERGEFORMAT} ""}
{IF {MERGEFIELD "LetterType"=2} {INCLUDETEXT "C:\\Project\\Letter2" \* MERGEFORMAT} ""}


  • The curly brackets { } cannot be entered from the key board. Either use Insert>Field, or Ctrl+F9.
  • Word uses spaces in the If..Then..Else statement.
  • The last two quote marks "" are "empty" , so nothing will be entered.
  • Notice the \\ in the path statement. A path is not needed if the Main document is in the same folder as the letters.
  • To see the field codes, use Alt+F9 to toggle the view on and off.
Letters 1 and 2 can have completely different texts, formats and layouts. One can be an invitation to a sale, the other can be a dunning letter. (To carry over different formatting, leave out the \* MERGEFORMAT switch)

After setting up the main document for mail merging, insert all of the fields you want to merge.

Copy the individual fields and paste them in the correct locations in Letter 1 and 2.

Go back to the main document and erase all of the text and fields EXCEPT for the IF statements.

Letters 1 and 2 do not have to be set up a merge docs, or connected to a data source. Their text will be inserted in the Main document depending on the field type.


See all Topics

Saturday, February 17, 2018

Font Lister

A look see


I haven't seen, lately, how many fonts you can have on a machine, but I know it's a lot more than earlier versions.

Here is a free download that will create an HTML file that will show all the fonts installed on your computer.

"Using FontList, you can change the predefined sample text, exclude seldom used fonts from the list and change the path for the HTML file.

In your browser, you can change the style of a font and zoom in on a font. You can also view the character map of a font. And, for some, maybe the most important feature, you can create a print out of all your fonts.


FontList


See all Topics

Thursday, February 15, 2018

Match Format Paste

Copy/Paste formatting in Word, PowerPoint or Excel


When you copy information from a Web page or another document, the formatting will also be copied.

To match the formatting of the target document, copy the text and place the cursor where you want to insert the copy.

Then, go to Edit>Paste Special, and select the Unformatted Text option.
(Click the arrow under Paste in the Clipboard group on the Home tab in 2007+)

The clipboard text will be pasted to match the target.

Another way when using Word 2002 + is to click on the "Smart icon" that appears at
the lower right corner of the pasted text. You can then choose to keep the original formatting, match the destination formatting, keep text only, or apply a new style.

An additional way to transfer just the formatting between documents is to highlight the text with the formatting you wish to copy and then hold down the Ctrl key and the Shift key and press the C key (Ctrl+Shift+C). Release the keys. Select the text you want to have formatted. Hold down the Ctrl key and the Shift key and press the V key (Ctrl+Shift+V). Only the formatting is copied, not the text.
In Excel use Edit>Paste Special and select the "Formats" option.


What's So Special About "Paste Special"? Video

Paste Special can also be used with graphics.

You can change Word's default behavior; choose whether to paste Inline or Floating.

Microsoft Word MVPS FAQ


See all Topics

Wednesday, January 31, 2018

Page Breaks

Demo tutorial


You can control when Word decides to break for a new page.
Ctrl+Enter is the keyboard shortcut, but there are a number of variations.

This MS link has both Demos and text tutorials.
Page breaks

BTW, a merged document is made up of Section breaks, not Page breaks.

For ease of printing, Replace ^b with ^m


See all Topics

Sunday, January 14, 2018

Keyboard ALT Codes

Quick inserts


Here is a collection of Alt codes. There is also a free download that you can post near your computer.

  • Alt Codes for Letters with Accents for Languages
  • Alt Codes for Bullets, Symbols and Other Special Characters
  • Alt Codes for Mathematical Symbols - Symbols used in Mathematics
  • Alt Codes for Currency Symbols
  • Alt Codes for Drawing
  • Alt Codes for Characters from the Greek Alphabet
  • Alt Codes for "Additional" Letters particularly for Nordic / Scandanavian Languages
  • Alt Codes for Spanish
  • Intellectual Property Right symbols.
  • Alt Codes for Arrows
  • Alt Codes for Punctuation and Editing
  • Alt Codes in Computer Programming
Alt Codes


See all Topics

Friday, December 29, 2017

Word to PP

Send outline to PowerPoint


That old 2003 version allowed you to send a Word file to PowerPoint and have it create a slide show.

After styling with Heading 1, 2, etc, go toFile > Send To > Microsoft Office PowerPoint.

2007+ is a little different (duh!)

For Microsoft Office 2007+

Word 2007+ doesn't allow you to publish to PowerPoint 2007 by default.

Here's the solution:

After you are done in Word 2007+, save it as a Word document.

Now open PowerPoint 2007+.

Click on the Office Button at the top left hand corner.

Click Open.

Under Files of type, select All Outlines.

Now select the Word document and click Open.

Alternately,

In Word 2007+, right click on the ribbon.

Select Customize Quick Access Toolbar.

Under "Choose commands from:", select Commands not in the ribbon.

Look for "Send to Microsoft Office PowerPoint".

Click OK.

The command will then be added onto the Quick Access Toolbar (QAT).


Word to PowerPoint

Word 2010 to PP 2010


See all Topics

Friday, November 24, 2017

Foxy or Ipsum

=rand(p,s)


In Word 2007+, =rand() produces a selection from the Help file.

=lorem() displays:


Lorem ipsum dolor sit amet, consectetuer adipiscing elit. Maecenas porttitor congue massa. Fusce posuere, magna sed pulvinar ultricies, purus lectus malesuada libero, sit amet commodo magna eros quis urna.
Nunc viverra imperdiet enim. Fusce est. Vivamus a tellus.
Pellentesque habitant morbi tristique senectus et netus et malesuada fames ac turpis egestas. Proin pharetra nonummy pede. Mauris et orci.


If you want some history, try Lipsum.com


Pre 2007:

To insert practice text in the document, type:
=rand()
and hit the ENTER key.

The whole equation would be:
=rand(p,s)
"p"is for p>aragraphs. "s" is for s>entences.

=rand(2,3)
would produce 2 paragraphs containing 3 sentences each.


It is said that:

The Italian edition of Microsoft Word 2000 produces:
"Cantami o Diva del pelide Achille l'ira funesta."

This is the first line of the Italian translation of Homer's Iliad.

In Spanish it's:
"El veloz murciélago hindú comía feliz cardillo y kiwi."

"The quick Hindu bat ate happy golden thistle and kiwi."

In French it's:
"Servez à ce monsieur une bière et des kiwis."

"Serve this gentleman a beer and some kiwis."

Other Panagrams

Choose Your Ipsum


See all Topics

Saturday, November 18, 2017

Task Panes

VBA at your own risk


From the MVPS.org site:

Word's Task Panes VBA Reference
The Mother of All Task Pane articles
By Steve Hudson

"Task Panes display within a Work Pane's area. A Work Pane is created by the combination of two objects. These objects are shrouded in misery and thwart most attempts to play with them. The whole area is hidden away from the Kill Cursor invoked with CTRL+ALT+-, which changes to a hand when waved over a Work Pane.
Functions are hidden away from the macro recorder. To make it easier, if it is not in this reference, it is hidden. It is like when a spy is caught and the government disavows all knowledge of their actions.
The Task Panes are spies from Microsoft that are known to only a few objects, in these versions of Office anyway.

Warning
The author gleefully notes at this point that the human race has enough intelligence to get itself into cauldrons of boiling water that it cannot climb out of and that means you and me both!
If you like to be ultra-safe, stay away from this reference and wait for MS to hand over full functionality. You will end up crashing Word many times and you can really damage your user interface."

(Ctrl+Alt+-, can be used to remove an item from a menu. Type the shortcut and then click on a menu item)


See all Topics

Thursday, October 26, 2017

Insert Line Breaks With Code

Label Captions


If you've ever needed to insert line breaks in a message box prompt, you most likely built a string that incorporated a line feed or carriage return character. Unfortunately, label objects aren't as forgiving when it comes to using these characters.

If you're setting a label's Caption property with code, you'll find that the special control characters are interpreted as squares, since they're otherwise un-displayable.
To successfully insert a line break in a label caption, you need to include both a line feed character and a carriage return character, entered consecutively.

To do so, you can use the Chr() function, such as:

Me.Label1.Caption = "Line 1" & _
Chr(13) & Chr(10) & "Line 2"

However, you can also simplify your code using an built-in constant:
Me.Label1.Caption = "Line 1" & vbCrLf & "Line 2"


See all Topics

Tuesday, October 10, 2017

Use the Ruler

Measure by Measure


Here is an article that explores the use of Word's Rulers.

About the only thing I don't see is that you can bring up the Page Setup dialog box by double clicking in the dark area of the ruler that indicates the margin.

Once again this tip comes from the Microsoft Word MVP site:

Ruler of all you survey:
How to make the best use of Word's rulers

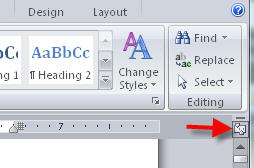
Here's the spot to click to show rulers in Word 2007-13:


See all Topics

Tuesday, October 03, 2017

Continued

More to come


You can place the word "More" or "Continued" at the bottom of every page except the last one.
The field, for those of you who know how to use them is:

{ IF { PAGE } = { NUMPAGES } "" "more" }

You can't just type in the brackets, you must use Insert>Field or Ctrl+F9.

Here is a more sophisticated formula:

{ IF { PAGE } < { NUMPAGES } "Continued on page {={PAGE} + 1}" "Last Page"}

Also see the Word MVP site:

How to control the page numbering in a Word document


See all Topics

Monday, September 11, 2017

Keyboard Shortcuts

Extra pilcrows?


Here is a list of keyboard shortcuts I once or never knew.

The one that struck me was:

Ctrl Alt K — Remove extraneous paragraph marks.

This removes doubled pilcrows (¶¶).

Word-Tips


  • Alt F6 — Swap open documents
  • Alt Shift D — Insert date
  • Alt Shift Up/Down — Move table rows or paragraphs up or down
  • Shift F5 — Go back to last position
  • Shift F3 — Change case
  • Ctrl Space — Remove direct formatting
  • Ctrl Q — Remove paragraph formatting
  • Ctrl Shift N — Apply Normal style
  • Ctrl Y — Repeat action
  • Ctrl ] — increase font size by 1pt
  • Ctrl [ — decrease font size by 1pt
  • Ctrl Shift > — Increase font to next size up
  • Ctrl Shift < — Decrease font to next size down


See all Topics

Saturday, September 02, 2017

Indent Code

Realign a bunch


Indenting blocks of VBA code, such as statements within loops or If...Then statements, makes reading a procedure much easier.

You probably indent a code statement using the [Tab] key, and outdent by using [Shift][Tab].

However, you may not be aware that the [Tab] and [Shift][Tab] techniques also work when multiple code lines are selected.

The Visual Basic Editor also provides Indent and Outdent buttons on the Edit toolbar that allow you to easily reposition blocks of code.


See all Topics

Friday, September 01, 2017

Convert List Numbers to Text

Pesky lists


Applying the list numbering style to paragraphs is easy. The problem is that if the style is removed, the numbers disappear as well.

The same thing is true with bullets.

The following macro will change the list numbers and LISTNUM fields to text and the bullets to a symbol font.


Sub NoAutoNum()
ActiveDocument.ConvertNumbersToText
End Sub

You can now do such things as individually format numbers and bullets.
The action is not reversible, so either use Undo right away, or use it on a copy of the original.

ConvertNumbersToText


See all Topics

Tuesday, August 29, 2017

Folder Tree

DOS is back


"To find out how many folders there are on your hard disk, you can open a Command Prompt and use the Tree command. You'll get a very nice looking graphical tree structure showing all the folders on your hard disk.

The only problem is that the display will scroll by your screen so fast and exceed the buffer size, so you'll never be able to see it."


Import Tree command into Word

(Open Command Prompt as Administrator. Rather than "Insert>File", open the file with Word and choose the MS-DOS format))


Tree command


See all Topics

Saturday, August 19, 2017

Slashed Zero

Oh!

ø

There is a discussion of the slashed zero at:
How to Insert a Slashed Zero (0 Overlaid with a /)

You can also download the Monaco font that has a slashed ø
(Monaco is an embeddable font)

Andale.ttf (Mono) has a dotted 0

Seagullscientific.com has a font called Crystal

Windows has a free font editor. Type eudcedit on the Start>Run line.
Vic Laurie has a description of the Private Character Editor- Eudcedit

You could also use the EQ field to create a strike through and assign it to an AutoCorrect entry.

{EQ \o (0,/)}

The easiest is, probably Alt+0216 or Alt+0248 It's a Latin "oh" with stroke, but it looks close.

The HTML character code is &oslash; ø


See all Topics

Wednesday, August 16, 2017

Link to Word

Excel to Word connection


The Insert Hyperlink dialog will allow you to link to any file.

To link to a particular bookmark in a Word document, you can specify the bookmark by adding it yourself, adding a # (pound sign) plus the bookmark name to the path and file name.

C:\My Documents\MyDocument.doc#MyBookmark

To link to a page in a Word document, add a pound sign and the page number after the document path and file name:

C:\My Documents\MyDocument.doc#4

See Jon Peltier's hyperlink collection:
Hyperlinks


See all Topics

Friday, July 28, 2017

Footnote Customization

Line it out


In Normal View:
  1. Go to View>Footnotes.

  2. Click the All Footnotes box arrow, and select Footnote Separator from the drop-down list.

  3. Click on the existing separator line and delete it.

  4. Go to Format>Borders And Shading.

  5. On the Borders tab, select the border you want.

  6. Select the color you want.

  7. Click OK.
You will see the new separator line for your footnote will appear in Print Layout or Print Preview.

Also:
Footnote FAQ


See all Topics