Saturday, January 23, 2016

Date an Octothorpe

Some more of those things I'm sure I used to know


The keyboard combination of Alt+Shift+D inserts the current date in MS Word and PowerPoint. Ctrl+; (semicolon) does it in Excel and Access.

If you do not like the date's format, select a different one with Insert>Date and Time and, if you would like to make that permanent, click on the Default button in the lower left corner of the dialog box (in PowerPoint it's in the lower right corner).

In Excel, Ctrl+Shift +# formats the entry as day-month-year. Ctrl+1 will display the "Format cells" dialog box.

BTW, the "hash, pound or number" sign # is also called an "octothorpe".

The person who named it combined Octo for the eight points and Thorpe for James Thorpe.

"Bell Labs engineer, Don Macpherson, went to instruct their first client, the Mayo Clinic, in the use of the new touch tone phone system. He felt the need for a fresh and unambiguous name for the # symbol. His reasoning that led to the new word was roughly that it had eight points, so ought to start with octo-. He was apparently at that time active in a group that was trying to get the Olympic medals of the athlete Jim Thorpe returned from Sweden, so he decided to add thorpe to the end."

While we're at it, the "backwards P, Enter mark" is actually named a "pilcrow".

The pilcrow was used in medieval times to mark a new train of thought, before the convention of using paragraphs was commonplace.

Also see:
Geek-speak names for punctuation marks

Wikipedia:
Punctuation


See all Topics

Sunday, January 17, 2016

Booklets

Sized and numbered


Word has the built-in ability to print booklets with automatically numbered pages.

"If you don't want to spend money on an add-in, or use VBA; and are willing to do a bit more work yourself, here is the method I use. I've produced booklets up to 100 pages long this way, and it works quite satisfactorily for me."


Word.MVPS.org:
Booklet printing

How-to Geek:
Create Booklet

RickySpears.com:
Microsoft Word Booklet Templates
"The WordBookletTemplates.zip file contains Microsoft Word templates for 4, 8, 12, 16, 20, 24, 28, and 32 page booklets, with and without page numbers (16 templates in all). I think I developed these with Microsoft Word 97 and I've never made any changes to them. They use a series of text boxes that flow from one to the other to get the text where it is supposed to be in the booklet."


See all Topics

Tuesday, January 12, 2016

Add Captions Programatically

When the project seems overwhelming


Faced with a repetitive task, I often have to make the decision, do I do it by hand again and again? Or do I write or find a macro to do the heavy lifting?
"Have you ever had a document with ten, twenty, or even 100 images, and then as an afterthought decided you wanted to add a caption to each of those images? This is an easy task through the user interface (UI). All you have to do is select each image, one at a time, and choose Insert, then Reference, then Caption. Unfortunately doing this through an image-heavy document is a boring chore and takes up a lot of time.

Fortunately, the Word object model lets you to apply a caption to a selected object. An add-in that does this for you is only a small chunk of code away. The sample add-in accompanying this article demonstrates how to do this. It also demonstrates many other details about working with shapes and images in Word programmatically that are useful to know about."

Working with Word Images Programmatically


See all Topics

Saturday, January 02, 2016

Readability Evaluation

What grade are you?


Word has a built in tool to determine the level of reading difficulty of a document.

To see the statistics:
  1. On the Tools menu, click Options, and then click the Spelling & Grammar tab
  2. Select the Check grammar with spelling check box
  3. Select the Show readability statistics check box, and then click OK
  4. On the Standard toolbar, click Spelling and Grammar
  5. In 2007, click the Office button in the upper left corner. Click Word Options. Choose Proofing and When correcting spelling and grammar in Word.
When Microsoft Word finishes checking spelling and grammar, it displays information about the reading level of the document.

Each readability score bases its rating on the average number of syllables per word and words per sentence.
Flesch Reading Ease score Rates text on a 100-point scale; the higher the score, the easier it is to understand the document. For most standard documents, aim for a score of approximately 60 to 70. The formula for the Flesch Reading Ease score is: 206.835 - (1.015 x ASL) - (84.6 x ASW) where: ASL = average sentence length (the number of words divided by the number of sentences) ASW = average number of syllables per word (the number of syllables divided by the number of words)
Flesch-Kincaid Grade Level score
Rates text on a U.S. school grade level. For example, a score of 8.0 means that an eighth grader can understand the document. For most documents, aim for a score of approximately 7.0 to 8.0.
The formula for the Flesch-Kincaid Grade Level score is:
(.39 x ASL) + (11.8 x ASW) - 15.59
Readability
Measuring the reading age of books and other reading matter.

Wikipedia.com:
 Flesch-Kincaid Readability Test
Support.Microsoft.com:
Frequently Asked Questions About Proofing Grammar

I am working on a law review article dealing with readability. We have found a problem with Microsoft Word's Flesch-Kincaid formula - it does not appear to be accurate. We took a sample text of slightly over 100 words, and ran the check. We then changed the word "report" to statement" (with everything else unchanged) and Word indicated a higher grade level. However, the grade level should not have been affected, since "report" and "statement" are both two-syllable words. It looks like Word is somehow incorporating number of characters in each word into it's Flesch-Kincaid score, which it should not. Any idea what the problem might be?


You're right, Word handles the formula a little differently.
BTW, they say the sample s/b 200+ words for reliability.

and:
Wikipedia


See all Topics

Friday, December 25, 2015

Insert>Fields

Tiny code snippets


Microsoft has included a number of code pieces that you can use without having to haul out the VBA editor. These codes handle such things as page numbers, Table of Contents, Merge data and more.

"Some 80-plus fields are built into Word that provide information about the file and the user; store, display, and manipulate reference information; and link the document to other applications - all without a bit of code."


Automate Word Documents with Minimal Code
By Cindy Meister


Cindy Meister is a Word MVP.

She also works with bobbin-lace. Here is a sample of a Honiton lace butterfly.

Also:

AddBalance.com:
Using { Fields } in Microsoft Word

GMayor.com
Formatting Word Fields with Switches

In 2007-10 you can use the =(Formula) field.
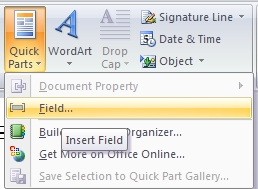
On the Insert tab look for Quick Parts:


See all Topics

Saturday, December 12, 2015

Justify Clean Up

Minimize white space


When a document is formatted with columns, the text is often Justified. This can lead to a messy layout of words and letters.
"When justifying text in Microsoft Word use the hyphenation feature to improve the look of your page. (Without hyphens). . . unnecessary 'white space' is distributed throughout. When hyphenation is turned on the overall typographic color of the page is much more even. To enable this feature in Microsoft Word do the following: After you have justified the columns in your document, choose from the "Tools menu" > Language > then from the dropdown menu, choose "Hyphenation", then choose "Automatically hyphenate document"


FontBlog:
Typography Tip #2


BTW, this goes along with one space after punctuation.
Bill Hill - There is only one space after a period


See all Topics

Friday, December 04, 2015

SCORE Templates

Free business advice


SCORE is a nonprofit organization providing small business advice and training.

SCORE's 10,500 volunteers have more than 600 business skills. Volunteers share their wisdom and lessons learned in business. Our volunteers are working/retired business owners, executives and corporate leaders.
  • SCORE offers Ask SCORE email advice online.
  • Face-to-face small business counseling at 389 chapter offices.
  • Low-cost workshops at 389 chapter offices nationwide.
  • "How to" articles and business templates
Here are some of the available templates:
A Business Plan for a Start-up Business
Microsoft Word
A Business Plan for an Established Business
Microsoft Word
Bank Loan Request for Small Business
Microsoft Word
Break-Even Analysis
Excel
Competitive Analysis
Microsoft Word
Financial History & Ratios
Excel
Loan Amortization Schedule
Excel
Opening Day Balance Sheet
Excel
Personal Financial Statement
Excel

Projected Balance Sheet
Excel
Start-up Expenses
Excel
4-Year Profit Projection
Excel
12-Month Cash Flow Statement
Excel
12-Month Profit and Loss Projection
Excel
12-Month Sales Forecast
Excel

SCORE Template Gallery


See all Topics

Friday, November 27, 2015

Page Numbers

A baker's dozen of ideas


Here is a collection of tips about how to display information in Headers and Footers.

Field codes are demonstrated. Remember that the brackets {} must be inserted with Ctrl+F9, not directly from the key board.

Here's one suggestion:

Display the word "more" at the bottom of every page except the last page.

Insert an "if" field into the footer.

The field in this case will be a compound entity that consists of two fields nested within a third field.

{ IF { PAGE } = { NUMPAGES } "" "more" }
  1. Position cursor where you want the field.
  2. Press Ctrl+F9 to insert the field braces.
  3. Type the field expression as it appears below, using Ctrl+F9 and arrow keys as needed to keep text within the various braces as you type.
    { IF { PAGE } = { NUMPAGES } "" "more" }
  4. Select the entire expression.
  5. Right-click the selection and choose Toggle Field Codes.
    (or use Alt+F9)
Headers and footers and page numbers


See all Topics

Thursday, November 19, 2015

Automate Word Tables

VBA examples and instructions


The Microsoft Developer's Network has a pretty comprehensive article on programmatically working with data and Word tables.

"You can look at the world as split into applications that store data (databases) and applications that present information, such as Microsoft Office Word 2003 and Microsoft Office PowerPoint 2003. Increasingly, the end user demands to display database content in documents and presentations.

While Word does provide some tools for displaying tables from databases in its documents, these are somewhat rudimentary, they require a basic understanding of how the database is built, and using them involves a number of steps. In addition, there may also be security and access issues involved, requiring additional layers of protection.

The developer is therefore increasingly confronted with the task of transferring data into Word, whether in the form of tables, or as part of the document text. This article considers some of the major aspects of using the Word object model to work with tables."


  • Introduction to Automating Tables
  • Creating Tables Programmatically in Word
  • Populating Word Tables with Data
  • Adding Linking in Word Tables Programmatically
  • Extracting Data from Word Tables Programmatically
A downloadable document is also available for those of us still addicted to paper. Automating Word Tables for Data Insertion and Extraction.


See all Topics

Monday, November 16, 2015

Kürzungen für jeder

Accessibility Shortcuts


Several resources are available to help increase speed and effectiveness for keyboard users. Here are keyboard shortcuts for leading Microsoft products that help save time and effort and provide an essential tool for some people with mobility impairments.

  • Internet Explorer (11/10/9/8/7/6)
  • Office (2013/2010/2007/2003)
  • PowerPoint
  • Publisher
  • Windows (8/7/Vista/2003/XP/2000)
  • Windows Media Player
Microsoft.com Keyboard Assistance.


See all Topics

Thursday, November 12, 2015

Mail Merge Page Printing

One big page


After completing a merge to a new document, the status bar may indicate that the insertion point is located on page 1 of 38 pages. This is a bit of mis-information.

If you turn on Show/Hide and look at the merged document in Normal view, you'll see that the merged document has section breaks rather than page breaks.

If you try to print what should be Page 1, the entire document will print.

To print just the first section, use "s1" in the Print dialog box.


Another way to handle it is to go to Edit>Replace and replace

"^b" (section break)

With

"^m" (manual page break)


From Office.Microsoft.com:
In the Pages box, type instructions to print one of the following:

Noncontiguous pages

Type the page numbers with commas between them. Type the range of pages with a hyphen between the starting and ending numbers in the range. For example, to print pages 2, 4, 5, 6, and 8, type 2,4-6,8
A range of pages within a section

Type p page number s section number. For example, to print pages 5 through 7 in section 3, type p5s3-p7s3
An entire section

Type s section number. For example, type s3
Noncontiguous sections

Type the section numbers with commas between them. For example, type s3,s5
A range of pages across sections

Type a range of page numbers and the sections that contain them with a hyphen between the starting and ending numbers in the range. For example, type p2s2-p3s5


See all Topics

Wednesday, November 11, 2015

Graphics from the '50s

Remember it the way you want to


Original fifties clipart? Just in time for the holidays, some Ozzie and Harriet style pics.


"Most communities in the fifties had small town print shops that doubled as printers of local news and advertising papers. These printers could not afford graphic artists so they used stock clipart supplied by large companies who distributed common graphics for use in advertising sections of the papers. They were provided for the printer in lots of categories to meet any advertiser's needs."

Retrographix.com


See all Topics

Thursday, November 05, 2015

Merge Pictures

Different picture to every letter in a mail merge


A variation of this technique could also be used with an IF statement to display different pictures based on some criteria, such as Zip code.
  1. Open the Excel worksheet that you use as the mail merge data source.

  2. Insert a new column that has a column heading such as Picture.

  3. For each row of the Excel worksheet, insert in the Picture column the path and the file name of the picture that you want to use for that record of the data source. Additionally, enclose the path and the file name in quotation marks (").

    For example, copy the path and the file name of the picture in Windows Explorer. Then, paste the path and file name into the Excel worksheet.

    Note The path and the file name of each picture in the Picture column will appear similar to the following example:


    "C:\Documents and Settings\username\My Documents\My Pictures\foldername\filename.jpg"

  4. On the Edit menu, click Replace. Then, replace each instance of a single slash mark (\) with double slash marks (\\) in each path.

    For example, each path should now look similar to the following example:

    "C:\\Documents and Settings\\username\\My Documents\\My Pictures\\foldername\\filename.jpg"

  5. Save and then close the Excel worksheet. Then, quit Excel.
In Word, follow these steps:
  1. Open the mail merge main document.

  2. If the Excel data source is not attached, attach the data source. To do this, go to Step 3 of 6 in the Mail Merge task pane. Click Browse, and then attach the Excel data source.

  3. Click Next: Write your letter.

  4. In the mail merge main document, move the insertion point to the location where you want the picture to appear.

  5. On the Insert menu, click Field.

  6. In the Field dialog box, click IncludePicture under Field names, and then click OK.

    Note You may receive the following error message:

    Error! Filename not specified

  7. Press ALT+F9 to display the field codes in the mail merge main document. You will see a field that is similar to the following field:

    { INCLUDEPICTURE \* MERGEFORMAT }

  8. Move the insertion point into the field immediately following INCLUDEPICTURE.

  9. Press the SPACEBAR, and then click More items on the Mail Merge task pane.

  10. In the Insert Merge Field dialog box, click the picture merge field, such as Picture, and then click Insert.

  11. Click Close to close the Insert Merge Field dialog box.

    The INCLUDEPICTURE field should now look similar to the following field:

    { INCLUDEPICTURE { MERGEFIELD "Picture" } \* MERGEFORMAT }

  12. Press ALT+F9 to hide the field codes in the mail merge main


  13. Click Next: Preview your letters.


  14. Click Next: Complete the merge.

  15. In the Mail Merge task pane, click Edit individual letters.

  16. In the Merge to New Document dialog box, click OK.

  17. On the Edit menu in the merged document, click Select All.

  18. Press F9 to update the fields in the merged document.
    (Word mail merges are not dynamic)

  19. To print your letters from the merged document, click Print on the File menu. Each printed letter will contain the picture that you specified in the Excel data source.
Knowledgebase #909132:
Different picture to every letter in a mail merge


See all Topics

Saturday, October 31, 2015

Almost All You Need to Know

Collection of Word explanations


Shauna Kelly is a Microsoft Word MVP.

She has compiled a gathering of important Word how to's and whys.
For new users of Microsoft Word
Basic concepts - Introduction
Styles in Microsoft Word
Tips for understanding styles
Formatting
How the Styles and Formatting pane works
Numbering, Bullets, Headings, Outlines
How to control bullets
Templates
What is the relationship between a Word document and its template?
Layout
How to keep a figure on the same page as its caption
Sharing Microsoft Word documents
What happens when I send my document to someone else?


Making the most of Word in your business:
Microsoft Word FAQ


See all Topics

Saturday, October 24, 2015

Clip Art Gallery

Sprinkle carefully


Judicious use of Clip art can spice up a document. Here's an article about how to customize existing pictures including:
  • Display clip-related toolbars
  • Customizing your clip art
  • Cropping
  • Sizing
  • Adding text wrapping
  • Blurring
  • Rotating and flipping
  • Adding a drop shadow
Edit clip art in Word


Halloween clips


See all Topics

Thursday, October 22, 2015

Split View

Top and bottom


If you need to look at more than one part of a document at once, consider splitting the window.

To split the current window, just go to Window>Split from the main menu.
(View>Split in 2007)

Another way is to use the splitter control between the file tab channel and the scroll bar for the doc.


To create new windows for the same document, just go to Window>New Window and create as many views on the same document as you would like. (View>New Window in 2007)


Split Screen Feature - Word 2013


See all Topics

Friday, October 02, 2015

Background Printing

Yes, you can!


Remember back in the old days of Word before 2003?

We would demonstrate how a background color or theme could be applied to a document. Then say something like, "But you can only see it on the screen."

That changed with 2003 and '07.

Go to Tools>Options.
(Word 2007+
Click the Microsoft Office Button, and then click Word Options.On the Display menu, click to select the Print background colors and images check box under Printing Options, and then click OK.)

Go to the Print tab and on the Include with document section,
put a check next to "Background colors and images" and click OK.


Now when you apply Theme formatting it will be printed as well as the text.
(A caveat might be that on a black and white printer, the result can appear muddy)

To apply a theme to a document go to Format>Theme. These are the same themes (colors, graphics and fonts) used in FrontPage.

This Knowledgebase article also offers suggestions on how to get around the problem in Word 2002.
Word 2003 or Word 2002 document that includes a background


See all Topics

Monday, September 28, 2015

Merge Formatting

$ lost


The data in Access or Excel has been formatted. You have leading zeros, percents, currency is formatted and so on.

Word 2000+, however loses the formatting when a mail merge is attempted.

Here's a fix.

Word has three potential data access methods, the "old fashioned" ODBC or DDE and the newer OLE DB.

ODBC and OLE DB can, quickly, extract data from a source application without opening the program. The application does not even have to be installed.

The downside is that these methods do not transfer the formatting in the data file. Individual MERGEFIELDs need to be formatted in Word.

DDE can be used with Excel and Access. It communicates with the source and carries the formatting into the target document. This is how it worked before Word 2002.

To have a choice go to:
Tools>Options>General "Confirm Conversions at Open"

When you connect to the Data Source, a dialog box will give you the opportunity to choose the type of connection to use.


If you don't see DDE, check Show all.
Also see:

Cindy Meister:
Mail Merge FAQ

Here are some other Mail Merge resources:
Mail Merge Links


See all Topics

Monday, September 14, 2015

Certificate of Anything

Make your own


Give your kid an award for not setting the house on fire in the last 24 hours.

Make a formal presentation to your dog for scaring away imaginary burglars.

The desktop publishing power of your computer can create official (looking) honors.

Here's a collection of free templates:

Southworth.com
Free Award And Certificate Templates


EducationWorld.com:
Award Certificates


Office.microsoft.com:
Certificates
(86 Certificates, labels, etc. Word, PowerPoint, and Publisher)


See all Topics

Monday, September 07, 2015

WordPerfect?

Word!


I used to ask "How many have ever used WordPerfect?" Over the years it has gone from about 50% to blank stares.

WordPerfect (WP) couldn't bring itself to accept the existence of Windows, and Microsoft ran past, taking over the market.

Word is Object-Oriented, WordPerfect is Stream-Formatted.
"What does this mean? Well, this basically means that when you make a change to a WordPerfect document, the changes take effect 'From THAT Point Forward'. You generally don't need to select an Object (e.g., a word, sentence, or a paragraph) in order to effect a change. You can simply select a color, a font, a paragraph style, etc, and the whole document will be affected (as stated, from that point forward). Stream Formatted is, as you can imagine, like a stream of formatting that flows throughout the document.

Word, on the other hand, is object-oriented. Every letter, word, sentence, and paragraph is an object. To help people grasp the concept of object-oriented programming, Microsoft uses a simple analogy: oranges. You can imagine that an orange has several attributes that can be changed: it has a color, a texture, etc. It can be changed by being painted or peeled. Therefore, once you understand that you need to select an object when you want to manipulate your Word document, you begin to understand how to work in Word."

WP vs. Word

WP is still around. Mostly used in the legal profession by those who still bemoan the loss of powdered wigs.

Here are some references:

The history of WordPerfect:
Almost Perfect
(a book by W. E. Peterson)

Wikipedia:
WordPerfect


See all Topics