Monday, August 22, 2016

Notes from Word

Import it all


One technique that can be used when preparing a PowerPoint show, is to import material from an existing Word Outline.

If the Word document is formatted with Heading styles, Heading 1 will become a new slide and the subsequent headings, 1 through 6 will become bullet points on the slide.

It may be desirable to prepare notes for each slide while developing the Word outline. Notes don't appear on the slide, they are placed on a separate page that can be printed out for the speaker or handed out to the audience.

Bill Dilworth has written a macro that moves information that has been formatted, say at Heading 6, and places it on the notes page:

"This macro outline allows the user to use Word's "Send To PowerPoint" feature, then run this macro to get notes from MS Word to PowerPoint as notes. The macro allows you to set the text level you want to become the notes."


Word Outline to Notes Page in PowerPoint


See all Topics

Thursday, August 18, 2016

Change Insert Picture Target

File location


If you would like to specify the folder Word will default to when you go to Inset>Picture:
  1. From the Tools menu, click Options.

  2. Select the File Locations tab.

  3. Select ClipArt Pictures from the File Types list.

  4. Click the Modify button.

  5. Navigate to the folder you want Word to default to.

  6. Click OK. OK.


In 2007-10, you'll find the entry by
  1. Click on the Office logo

  2. Go to Word Options>Advanced

  3. Scroll down to General

  4. Click the File Locations button


See all Topics

Saturday, August 13, 2016

Stencils are Digital Stencils

Make your own


If you have a document; such as a report or reoccurring newsletter, one way to reduce the production time is to create a template.

These preformatted, boiler plated documents can then be fleshed out without having to reinvent the sardine.

Here are some tutorials to help you along:

AddBalance.com
Template Basics

About.com
Word Templates


See all Topics

Friday, August 12, 2016

Sparklines

Quick graphic reinforcement


A graph or chart can give the reader a visual representation of a great deal of data. Concepts or results can be more easily grasped by a well formatted graphic.

Charts, usually, take up more space in a document than is absolutely required.

Edward Tufte has come up with the concept of Sparklines (Sparklines:Intense, Word-sized Graphics)
.
These are small graphs about the same height and width as common words. They are not out of place in the text of a document.

Sparklines give the reader a snapshot of the data that quickly supports the material being discussed.


See:
Sparklines Tutorial

Bisantz Sparklines


See all Topics

Wednesday, August 10, 2016

Hidden Macro Names and SHortcuts

Revealed


Word has built in macros to perform routine actions such as using the Format Painter to copy formatting.

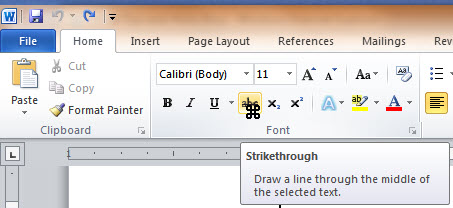
Rather than trying to guess the name or look up the shortcut keys, use this seldom mentioned trick to find toolbar macro names.

Press the three key combination of Ctrl, Alt, and + (the plus sign on the Numbers keypad).

The mouse pointer changes to a 4-leaf clover.

Click on a toolbar icon. Word will display a form revealing the macro name and the assigned shortcuts.


(It works the same way in 2007+)


See all Topics

Sunday, August 07, 2016

Password Background

Unencrypted

Alan Myrvold has written a background article on how Office handles passwords and what password strength means.

"Word, Excel, and PowerPoint have been able to password protect documents for several versions by setting the 'password to open'. What we felt could be improved was the ability to enforce password strength rules, similar to what may be required when logging into your computer at work."


Enabling password rules for Office 2010+


See all Topics

Thursday, August 04, 2016

REDUCE MISSPELLLINGS

You might be missing typos in tables

If you've ever found typos in a table or list that you're positive you remember spell checking, chances are that the typos are in words that are purposely skipped during the spell check.

By default, SpellChecker ignores words that are all upper-case or that have numbers in them. In most cases, this is probably fine. However, especially with purchased data, you'll occasionally come across tables where everything is capitalized.

Fortunately, you can change the way SpellChecker works so that all words are included.

To do so, run the SpellChecker on a data selection that will cause the Spelling dialog box to be displayed.

Then, click the Options button and clear the Words In UPPERCASE and Words With Numbers check boxes.

Finally, click OK and then Cancel.


See all Topics

Wednesday, August 03, 2016

Find the Word

And Replace


Word has one of the most complete and malleable Find/Replace systems of any application.
Here is a 26 page report on how to use it from Editorium.com.
While your there, sign up for the free newsletter.

Advanced Find and Replace for Microsoft Word

"One of Word's most powerful features, especially for editing, is Find and Replace using wildcards and character codes. This free tutorial (a Word document) will take you step by step through what you need to know. If you don't download anything else here, be sure to get this--and work your way through it. It's well worth the effort."


Editorium.com/Freebies


See all Topics

Friday, July 29, 2016

Spell Check On

Spell check off


You can run Spelling and Grammar checking in Word by clicking on the ABC icon on the Standard toolbar (it's on the Review ribbon in Word 2007), going to Tools> Spelling and Grammar, or just hitting the F7 key.

As you go through the document, you may find areas that you would like to correct. You don't have to close the Spell checker, just click into the document, make the changes and click Resume in the Spell checker dialog box.

You can also flip focus to the document with Ctrl+Tab.
Then go back to checking with Resume.


See all Topics

Thursday, July 21, 2016

Color News

A multidiscipline subject


Here is a study about how color effects a reader's choice of concentration.

It was intended for newspaper publishers, but the same knowledge can be used in Web design, PowerPoint, or any other reporting application. Word and Excel will also benefit.

Color, Contrast, and Dimension in News Design

Color Project

The Poynter Institute is a school for journalists, future journalists, and teachers of journalists.
Poynter.org


See all Topics

Monday, July 11, 2016

Change Code to Comments

Fast solution


When you're testing procedures, you can temporarily convert a block of VBA code to comments that will be ignored during a trial run.

Doing so manually by inserting an apostrophe before each line of code can be a real chore.

To simplify this task,
  1. Open any module in the Visual Basic Editor (VBE)
  2. Choose View >Toolbars>Edit from the menu bar to display the Edit toolbar.
  3. Select the lines of code that you want to turn into comments.
  4. Click the Comment Block button on the Edit toolbar (it's the sixth button in from the right end of the toolbar).
Each line of the selected code is now preceded with an apostrophe. To convert the comments back to executable code, select the appropriate lines and click the Uncomment Block button, which is immediately to the right of the Comment Block button.


See all Topics

Wednesday, July 06, 2016

Thumbnail Views

Little pages


The Thumbnail view can be used to see the layout of a page or to jump from one page to another.

With Word 2003 and 2007, Thumbnail views are available in Normal, Print Layout, Outline, and Reading Layout views. Go to View>Thumbnails to display the Thumbnail pane to the left of your document. In 2007+ go to View>Navigation tab>Show.

Thumbnail versions of your document will appear in a new pane to the left of your current document. Click on a thumbnail page and Word 2003/7 will automatically jump to the selected page.


See all Topics

Friday, July 01, 2016

Calculation Tool in Word

Select and Add


In Excel an instant answer is displayed on the Status bar, when a series of numbers is selected.

If you would like to calculate lists or columns of numbers in Word, look at ToolsCalculate. It will display the answer AND let you paste the result in your document.

ToolsCalculate can be added to a menu or tool bar. Pre-2007, it is available through Tools>Customize.
  1. On the Commands tab, select All Commands in the Category list, then scroll down the Commands list until you find ToolsCalculate.

  2. Drag it to the menu bar and hover the mouse over "Tools" until the Tools menu drops down.

  3. Drop Tools Calculate somewhere on the menu or drop it on a toolbar.

  4. Close the Customize box.
For directions see:
MVPS.org FAQ
  1. Type the numbers you want to calculate, along with the appropriate mathematical operators.

    Word can calculate numbers in a line, in a column or row in a table, or in a column separated from other columns with tabs. Word can also calculate numbers interspersed throughout the text in one or more paragraphs if you include a space on either side of each number.

  2. Select the numbers and operators.

  3. From the Tools menu, choose Calculate.

    Word calculates the result and displays it for a few seconds in the status bar. The result is stored on the Clipboard.

  4. To insert the result into your document, position the insertion point and choose Paste from the Edit menu (CTRL+V) or click the Paste button on the Toolbar.
This is left over from the halcyon days of Word 2.0 when Woody Leonard and Ed Bott were but children.


In 2007-10+,
  1. Click the Office logo
  2. Go to Word Options on the bottom of the box.
  3. Go to Customize.
  4. Select All Commands and find Calculate.
The Calculate icon will now appear on the Quick Access toolbar.


See all Topics

Monday, June 27, 2016

Theses by the Numbers

Colour or Color?


The University of Calgary has a step by step tutorial on how to write a thesis.

  1. Choose a template
  2. Download a template
  3. Guidelines
  4. Styles & their Relevance
  5. Saving your files
  6. Writing - hints & tips
  7. Creating the Front Matter
  8. Assembling Chapters
  9. Page Numbers
  10. Printout & Submission

Included are Word Thesis Templates
Some of the hints may provide you with some help even if you use the letter "U" in a more parsimonious manner.


See all Topics

Wednesday, June 22, 2016

Adjust a Page Border

Fix the box


There is a border around your title page, but the bottom line doesn't print. Usually the reason is that the bottom line (or on a landscape page, the right border) falls within your printer's unprintable area. Here are some suggestions for finding just where that area is and how to adjust your border so that it will print.

  • Find your printer's unprintable area

    Your printer manual may specify the unprintable areas. Inkjet printers, in particular, often have a large unprintable area at the bottom of the page.

    Here's a way to discover them for yourself in Word.

    1. Choose File>Page Setup>Margins tab. Change all four margin settings to 0". Choose OK.

    2. You're told that one or more margins are set outside the printable area of the page. Choose Fix.

    3. Word adjusts the margin settings to your printer's minimum values. Jot down your printer's settings for your future reference, then Cancel the dialog.

  • Adjust the Page Border

    1. Set the insertion point on the page that's bordered, then choose Format>Borders and Shading> Page Border tab. Choose Options.

    2. At the Border and Shading Options dialog, note that the default settings are to have all four borders set to 24 pt (which is 1/3"), and to have Measure from: set to Edge of Page.

    3. To maintain the measurement from the edge of the page, yet move the borders in more toward the center, set the measurements for each of the four margins to 31 pt (the maximum allowed).

      For an alternative setting, set Measure from: to Text. Now the Margin settings measure outward from your text margins. You can set the Margin values anywhere from 0 pt to 31 pt.

    4. Click OK>OK. Use the Standard toolbar's Print Preview tool to evaluate your results.

The border is measured from your text margins, not from your actual text. So, if your bottom border still doesn't print, increase the size of your bottom margin, then adjust the other margins as needed for a balanced appearance.


See all Topics

Friday, June 17, 2016

Unicode is Huge

More symbols and letters


This free download lets you see and select more characters in the Unicode set. The Unicode Character Grid shows all assigned characters and private use characters in Unicode 6+.


BablePad

Here's a blog covering Scripts, Unicode, Character Encoding and BabelStone Stuff
BableStone Blog


See all Topics

Tuesday, June 07, 2016

Format Cleansing

Go back to a simpler time


There can come a time when a document becomes too complicated and the formatting appears more like mud.

For most documents it's a good idea to use styles. These help standardize the formatting for the whole document. But what happens when the paragraph or word doesn't appear in the correct style? While a style is set for each paragraph, it can be overridden by separate formatting for all or part of the paragraph. When you paste in text from another document or web page, it will bring with it the formatting on the source page.

Here's a quick shortcut that will remove all additional formatting from a selection and leave you with normal formatting.

Ctrl+SPACEBAR Remove character formatting

Ctrl+Q Remove paragraph formatting

To clear up the whole document try:

Ctrl+A Then one or both of the shortcuts.

To just get back to Normal Style use:
Ctrl+Shift+N


See all Topics

Sunday, June 05, 2016

Insert Page Numbers

Don't get framed


If you use Insert>Page Numbers to number your document, the character will be contained in a frame.

This can, sometimes, make formatting the Header or Footer difficult.

A more versatile solution is to use Insert>Field.
Look for PAGE and NUMPAGES.

See:
Word.MVPS.org:
How to control the page numbering in a Word document

"Page X of Y" gives wrong numbers

YouTube:
Placing the page number correctly on a landscape page


There is, also, an excellent discussion about how Word handles numbering at the
Microsoft Word MVP FAQ Site


See all Topics

Saturday, May 28, 2016

Declaring Multiple Variables

Declare each one


When setting up a macro in VBA, if you want to declare multiple variables in one line of code, be sure to specify the type for each variable, even if the variables are the same type. Avoid code like the following:

Dim strFName, strLName, strMI As String

In such a case, only the last variable, strMI, is actually declared as a String type. The first two variables are designated by default as Variant data types.

To correctly declare the three variables, you would use the statement:

Dim strFName As String, strLName As String, strMI As String


See all Topics

Saturday, May 21, 2016

Place Marker

If it's broke, fix it


To return to your last edit point, press Shift+F5. For instance, if you have copied and want to return to where you were in order to paste.

Press Shift+F5 again to go to up to the last three edit points, or a fourth time to return to where you started.

In Word 97 you could use this when you first open a document, to go straight back to where you last edited.

There was a change with 2000+ that broke this. The \PrevSel1 bookmark is destroyed when the document is saved.

The Word MVP site has a fix and some other interesting suggestions:

GoBack (Shift+F5) doesn't work in some newly-opened documents

Here are some more bookmarks:
Predefined bookmarks


See all Topics